728x90
고객사에 설치된 PHP 버전이 5.4.6 이 설치되어 있더라.
PHPINFO 로 확인해보니 mcrypt.so 파일과 mbstring.so 파일이 설치되어 있지 않았다.
mcrypt 모듈 설치
먼저 libmcrypt-2.5.8.tar.gz 파일이 위 경로에 받아져 있거나 Upload로 올려져 있어야 한다.
PHP 5.4.6 소스 설치된 폴더 경로가 /home/install_files/ 라고 되어 있다고 가정한다.
|
cd /home/install_files/
tar -xvzf libmcrypt-2.5.8.tar.gz
cd libmcrypt-2.5.8
./configure --prefix=/usr/local/
make && make install
cd /home/install_files/php-5.4.6/ext/mcrypt
# phpize 파일을 실행한다.
/usr/local/bin/phpize
./configure --with-php-config=/usr/local/bin/php-config --with-mcrypt=/usr/local/
make
# cd modules
# ll 하면 mcrypt.so 파일이 생성된 것을 확인할 수 있다.
cd /usr/local/lib/php/extensions/
cd /home/install_files/php-5.4.6/ext/mcrypt
cp -arp modules/mcrypt.so /usr/local/lib/php/extensions/
cd /usr/local/lib/php/extensions/
# php.ini 수정 사항
# phpinfo 파일에서 설치된 경로를 확인해야 한다.
# /usr/local/lib/php.ini
# 검색 기능으로 /extension= 로 검색하여 추가한다.
cd /usr/local/lib/
vi /usr/local/lib/php.ini
extension=/usr/local/lib/php/extensions/mcrypt.so
# 아파치 재시작
# ps -ef | grep httpd
/usr/local/apache/bin/apachectl restart
|
mbstring 모듈 설치
|
# mbstring 모듈 추가
cd /home/install_files/php-5.4.6/ext/mbstring
/usr/local/bin/phpize
./configure --with-php-config=/usr/local/bin/php-config --enable-mbstring
make
# ll ./modules/mbstring.so 파일이 생성되었는지 확인한다.
cd /home/install_files/php-5.4.6/ext/mbstring
cp -arp modules/mbstring.so /usr/local/lib/php/extensions/
cd /usr/local/lib/php/extensions/
# php.ini 수정 사항
# 검색 기능으로 /extension= 로 검색하여 추가한다.
vi /usr/local/lib/php.ini
extension=/usr/local/lib/php/extensions/mbstring.so
# 아파치 재시작
/usr/local/apache/bin/apachectl restart
|
설치된 PHP 모듈 확인하기
|
/usr/local/bin/php -m
|
PHPINFO 로 확인시 아래 그림과 같이 나온다.

728x90
'리눅스' 카테고리의 다른 글
| CentOS 7 openssl 최신버전으로 업그레이드 (1) | 2021.07.24 |
|---|---|
| CentOS 7 sftp chroot (0) | 2021.07.22 |
| CentOS 5.9 YUM 설치 불가 해결 (0) | 2021.07.21 |
| PHP Excel Library 설치 (0) | 2021.04.10 |
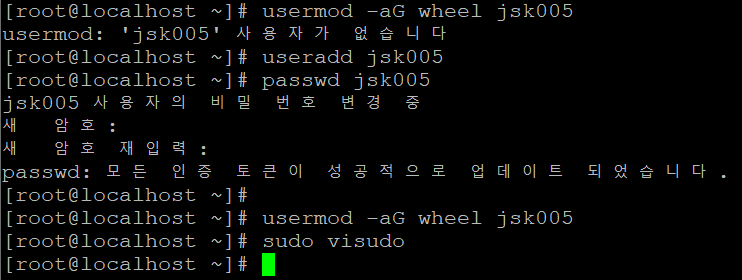
| 일반사용자 root 권한 부여 (0) | 2021.04.10 |

Link2Me