
플러터를 처음 실행하는 과정을 적어둔다.

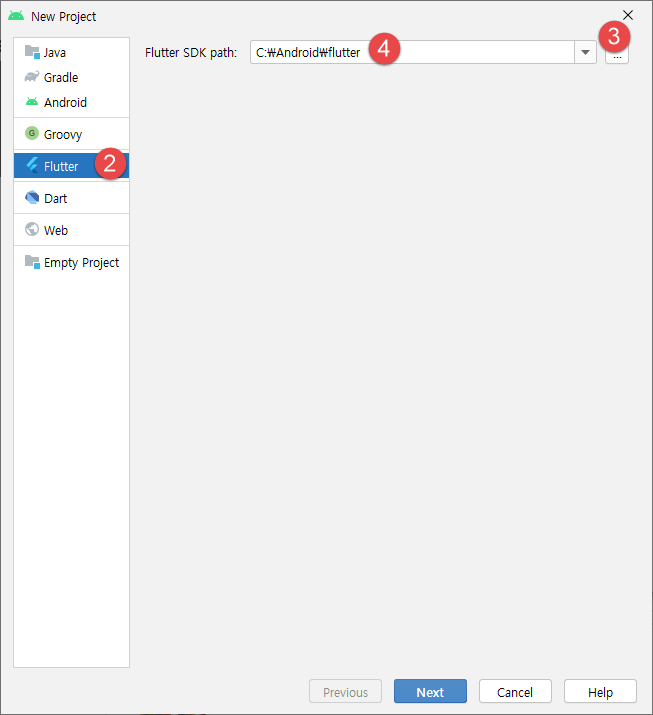
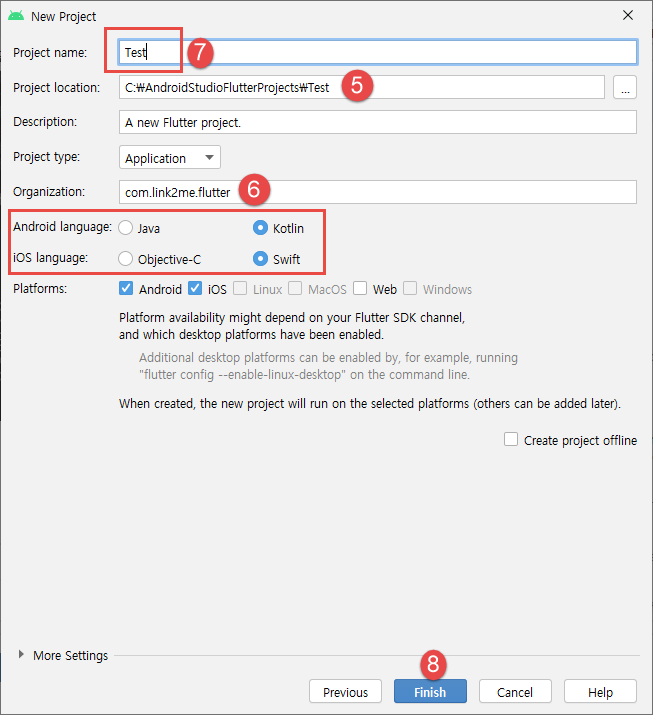
7번은 반드시 소문자로 적어야 한다.
앱의 이름은 대소문자를 구분하지 않으니 전부 소문자로 적어야 한다.
소문자 사이에 _를 넣는 스네이크 케이스를 추천한다.
test라는 건 인식을 못하더라. 그래서 myapp 으로 입력했다.

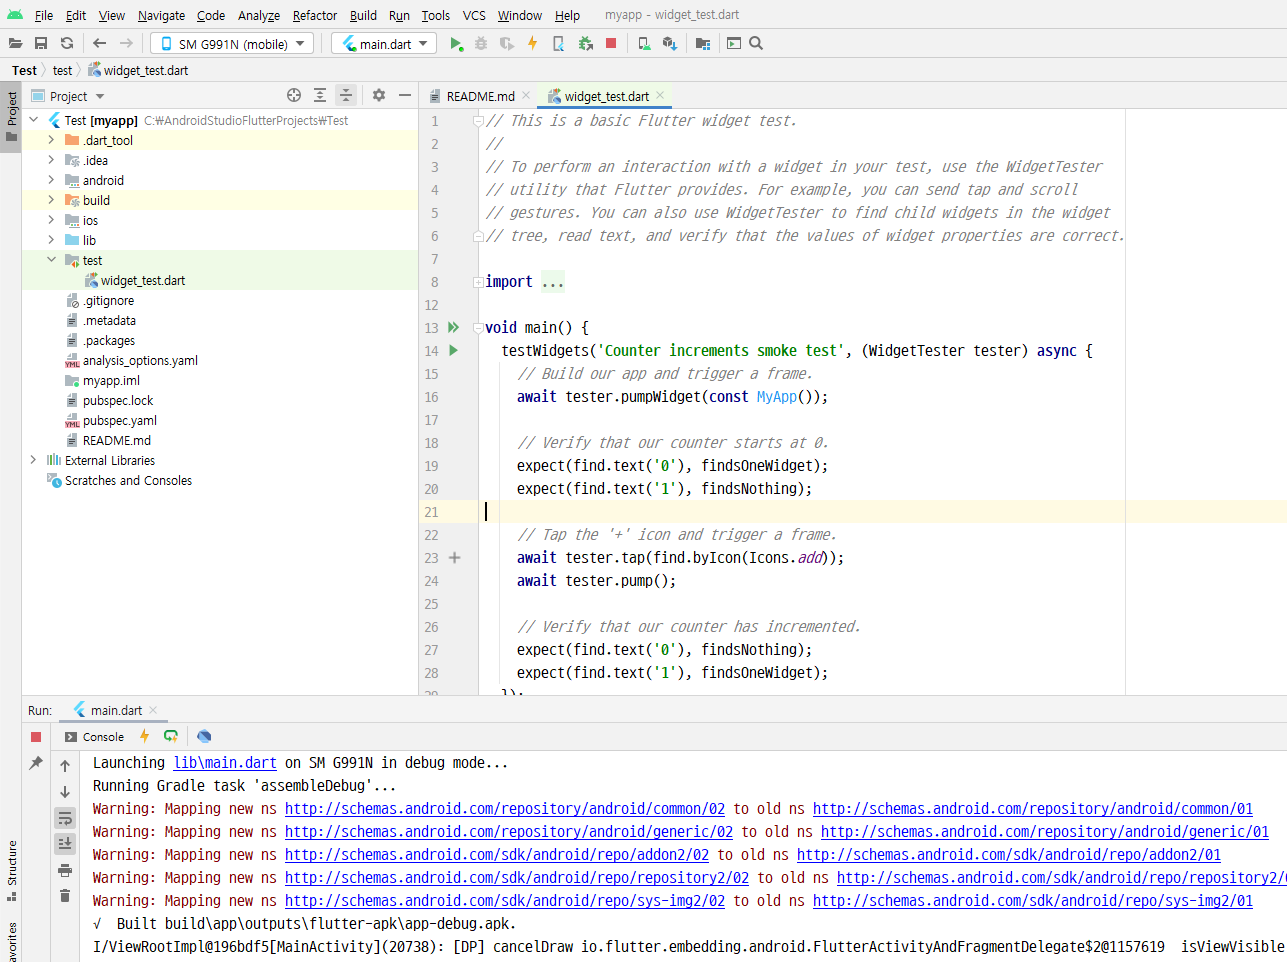
Android 폰을 연결하고 컴파일을 했더니 데모 앱이 화면에 나온다.
폴더 구조를 보면....
android 와 ios : 각 플랫폼 전용 폴더로 대개 손댈 필요가 없다.
lib : 플러터 소스코드(.dart 파일) 위치
test : 유닛 테스트가 있으면 여기에 넣는다.
pubspec.yaml : 프로젝트 파일로 프로젝트 이름, 설명, 의존성 등을 설정한다.
.metadata 와 .package : 중요한 설정파일로 개발자가 열어볼 필요는 없다.

앱을 웹 앱으로 실행하면 플러터는 브라우저를 기기로 간주한다.

앱을 에뮬레이터로 실행하는 경우이며, 기기를 종료하고자 하면 빨간색 메모 버튼을 누르면 된다.
코드를 추가하거나 수정하고 저장 버튼을 누르면 에뮬레이터(또는 폰)에서 즉시 변경되어 로드된다. 이 기능을 핫 리로드라고 한다.
플러터 세계에서는 컴포넌트를 위젯이라고 한다. 위젯을 합쳐서 커스텀 위젯을 만들고, 커스텀 위젯을 합쳐서 더 복잡한 커스텀 위젯을 만든다. 완전한 앱이 만들어질 때까지 이 과정을 계속해야 한다.
값 위젯(Text 위젯, Image 위젯), Layout 위젯, Navigation 위젯, 기타 위젯 등은 앱의 구성요소다.
모든 위젯은 속성과 메소드를 가질 수 있는 클래스이다.
모든 위젯은 생성자를 가지며, 생성자의 매개변수는 있을 수도 있고 없을 수도 있다.
모든 위젯은 BuildContext 를 인수로 받는 build 메소드가 있다는 점이 중요하다.
이것으로 Flutter 기본적인 시작 준비가 된 것 같다.
플러터 앱은 main()함수에서 시작한다.
main 함수는 runApp()이라는 함수를 호출한다. runApp()은 위젯 하나를 인수로 받는다. 이 위젯은 루트 위젯으로 어떤 이름을 붙여도 상관없지만 플러터의 StatelessWidget을 상속한 클래스여야 한다.
|
import 'package:flutter/material.dart';
void main() {
runApp(const MyApp());
}
class MyApp extends StatelessWidget {
const MyApp({Key? key}) : super(key: key);
// This widget is the root of your application.
@override
Widget build(BuildContext context) {
return MaterialApp(
title: 'Flutter Demo',
theme: ThemeData(
primarySwatch: Colors.blue,
),
home: const MyHomePage(title: '플러터 데모 Main'),
);
}
}
class MyHomePage extends StatefulWidget {
const MyHomePage({Key? key, required this.title}) : super(key: key);
final String title;
@override
State<MyHomePage> createState() => _MyHomePageState();
}
class _MyHomePageState extends State<MyHomePage> {
int _counter = 0;
void _incrementCounter() {
setState(() {
_counter++;
});
}
@override
Widget build(BuildContext context) {
return Scaffold(
appBar: AppBar(
title: Text(widget.title),
),
body: Center(
child: Column(
mainAxisAlignment: MainAxisAlignment.center,
children: <Widget>[
const Text(
'You have pushed the button this many times:',
),
Text(
'$_counter',
style: Theme.of(context).textTheme.headline4,
),
],
),
),
floatingActionButton: FloatingActionButton(
onPressed: _incrementCounter,
tooltip: 'Increment',
child: const Icon(Icons.add),
), // This trailing comma makes auto-formatting nicer for build methods.
);
}
}
|
Widget build 부분을 변경해가면서 코딩 연습을 해본다.
|
@override
Widget build(BuildContext context) {
return Scaffold(
appBar: AppBar(
title: Text(widget.title),
),
body: Center(
child: Column(
mainAxisAlignment: MainAxisAlignment.center,
children: <Widget>[
Text(
'당신은 버튼을 눌렀어요 :',
softWrap: false, // 텍스트가 영역을 넘어갈 경우 줄바꿈 여부
style: Theme.of(context).textTheme.headline5,
),
Text(
'$_counter 번',
style: Theme.of(context).textTheme.headline5,
),
],
),
),
floatingActionButton: FloatingActionButton(
onPressed: _incrementCounter,
tooltip: 'Increment',
child: const Icon(Icons.add),
), // This trailing comma makes auto-formatting nicer for build methods.
);
}
|
화면 구성하는 것을 이해하기 위해 다시 수정해 본다.
|
import 'package:flutter/material.dart';
void main() {
runApp(const MyApp());
}
class MyApp extends StatelessWidget {
const MyApp({Key? key}) : super(key: key);
// This widget is the root of your application.
@override
Widget build(BuildContext context) {
return MaterialApp(
title: 'Flutter Demo',
theme: ThemeData(
primarySwatch: Colors.blue,
),
//home: const MyHomePage(title: 'Flutter Demo Home Page'),
home: HelloPage(title: 'Hello Flutter',));
}
}
// Android Studio 에서 stful 엔터를 치면
// 자동으로 만들어진다. 여기에 클래스 이름만 지정한다.
class HelloPage extends StatefulWidget {
const HelloPage({Key? key, required this.title}) : super(key: key);
final String title;
@override
_HelloPageState createState() => _HelloPageState();
// Stateless 위젯과 다른 점은 createState() 메소드를 통해
// 상태를 담당하는 클래스를 지정할 수 있다.
}
// 클래스 이름 앞에 _가 붙어 있으면 private 클래스로 본다.
// 다트에서는 Java와 같이 public, protected, private 같은 접근 제어자 키워드 없음.
class _HelloPageState extends State<HelloPage> {
@override
Widget build(BuildContext context) {
return Scaffold(
appBar: AppBar(
title: Text(widget.title),
),
body: Text(
'Hello, World',
style: TextStyle(fontSize: 20),
),
);
}
}
|
'Flutter 앱 > 환경설정' 카테고리의 다른 글
| Flutter Upgrade (0) | 2022.06.17 |
|---|---|
| dart-sdk 설치 (0) | 2022.01.11 |
| Target of URI doesn't exist 'package:flutter/material.dart' (0) | 2022.01.11 |
| Firebase 프로젝트 등록 방법 (0) | 2021.12.29 |
| Flutter 설치 (0) | 2021.12.20 |

Link2Me