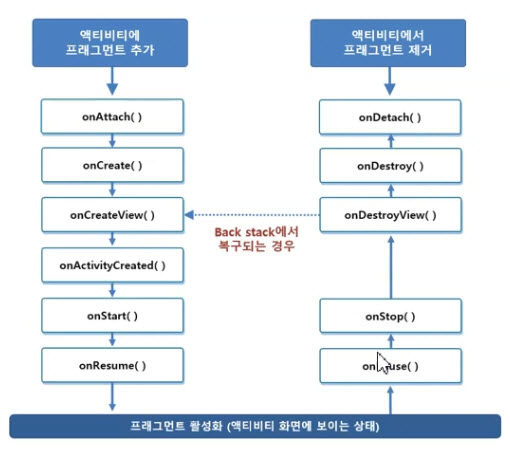
fragment란 activity안에 속해있는 화면으로 새로운 activity를 띄우는게 아니라,
하나의 activity에서 fragment만 바꿔가면서 보여주기 때문에
한 activity화면에서 여러개의 화면을 볼 수 있게 해주는 것이라고 할 수 있다.
https://developer.android.com/guide/components/fragments.html
본 예제는 두 개의 Fragment 를 생성하고 하나의 Fragment 만 Activity 상에 보이도록 할 것이다.
그리고, 액티비티의 버튼을 누르면 다른 Fragment 로 교체되도록 하는 내용에 대해서 적어둔다.
=== fragment01.xml ===
<?xml version="1.0" encoding="utf-8"?>
<LinearLayout xmlns:android="http://schemas.android.com/apk/res/android"
android:orientation="vertical"
android:layout_width="match_parent"
android:layout_height="match_parent">
<TextView
android:id="@+id/tv01"
android:text="프레그먼트01 입니다"
android:textSize="20dp"
android:layout_width="match_parent"
android:layout_height="wrap_content" />
<Button
android:id="@+id/btn01"
android:text="Fragment02 로 이동"
android:layout_width="wrap_content"
android:layout_height="wrap_content" />
</LinearLayout>
=== fragment02.xml ===
<?xml version="1.0" encoding="utf-8"?>
<LinearLayout xmlns:android="http://schemas.android.com/apk/res/android"
android:orientation="vertical"
android:background="#ff0"
android:gravity="center"
android:layout_width="match_parent"
android:layout_height="match_parent">
<TextView
android:id="@+id/tv02"
android:text="프레그먼트02 입니다"
android:textSize="20dp"
android:layout_width="wrap_content"
android:layout_height="wrap_content" />
<Button
android:id="@+id/btn02"
android:text="Fragment 01로 이동"
android:layout_width="wrap_content"
android:layout_height="wrap_content" />
</LinearLayout>
=== activity_main.xml ===
<?xml version="1.0" encoding="utf-8"?>
<RelativeLayout xmlns:android="http://schemas.android.com/apk/res/android"
xmlns:tools="http://schemas.android.com/tools"
android:id="@+id/parentView"
android:layout_width="match_parent"
android:layout_height="match_parent" >
<fragment
android:id="@+id/frag01"
android:name="com.tistory.link2me.fragment.Fragment01"
android:layout_width="match_parent"
android:layout_height="match_parent" />
</RelativeLayout>
=== Fragment01.java ===
package com.tistory.link2me.fragment;
import android.os.Bundle;
import android.support.v4.app.Fragment;
import android.view.LayoutInflater;
import android.view.View;
import android.view.ViewGroup;
import android.widget.Button;
public class Fragment01 extends Fragment {
public View onCreateView(LayoutInflater inflater, ViewGroup parentView, Bundle savedInstanceState){
// 인플레이트(inflate)를 한다는 것은 동작 가능한 view 객체로 생성한다는 의미
ViewGroup rootView = (ViewGroup) inflater.inflate(R.layout.fragment01, parentView,false);
Button btn = (Button) rootView.findViewById(R.id.btn01);
btn.setOnClickListener(new View.OnClickListener(){
@Override
public void onClick(View v) {
MainActivity mainActivity = (MainActivity) getActivity();
mainActivity.onFragmentChanged(0);
}
});
return rootView;
}
}
=== Fragment02.java ===
package com.tistory.link2me.fragment;
import android.os.Bundle;
import android.support.v4.app.Fragment;
import android.view.LayoutInflater;
import android.view.View;
import android.view.ViewGroup;
import android.widget.Button;
public class Fragment02 extends Fragment {
public View onCreateView(LayoutInflater inflater, ViewGroup parentView, Bundle savedInstanceState){
ViewGroup rootView = (ViewGroup) inflater.inflate(R.layout.fragment02, parentView,false);
Button btn = (Button) rootView.findViewById(R.id.btn02);
btn.setOnClickListener(new View.OnClickListener(){
@Override
public void onClick(View v) {
MainActivity mainActivity = (MainActivity) getActivity();
mainActivity.onFragmentChanged(1);
}
});
return rootView;
}
}
=== MainActivity.java ===
package com.tistory.link2me.fragment;
import android.support.v4.app.Fragment;
import android.support.v7.app.AppCompatActivity;
import android.os.Bundle;
public class MainActivity extends AppCompatActivity {
Fragment01 fragment01;
Fragment02 fragment02;
@Override
protected void onCreate(Bundle savedInstanceState) {
super.onCreate(savedInstanceState);
setContentView(R.layout.activity_main);
// 초기 지정은 frag01 로
fragment01 = (Fragment01) getSupportFragmentManager().findFragmentById(R.id.frag01);
fragment02 = new Fragment02();
}
public void onFragmentChanged(int index){
if(index == 0){
getSupportFragmentManager().beginTransaction().replace(R.id.parentView,fragment02).commit();
} else if(index == 1){
getSupportFragmentManager().beginTransaction().replace(R.id.parentView,fragment01).commit();
}
}
}
'안드로이드 > Layout' 카테고리의 다른 글
| Android Fragment 기본 예제 (0) | 2018.09.11 |
|---|---|
| FloatingActionButton(FAB) (0) | 2018.08.15 |
| LinearLayout weight (0) | 2018.03.01 |
| Android ViewFlipper(뷰플리퍼) (0) | 2017.05.02 |
| 안드로이드 Layout (0) | 2016.07.23 |

