1. 터미널을 열고 다음 명령어를 실행하여 필요한 패키지들을 설치한다. dev_dependency 설치
dart pub add -d freezed build_runner json_serializable
2. 터미널에서 다음 명령어를 실행한다. dependency 설치
dart pub add freezed_annotation json_annotation
그러면 아래와 같이 pubspec.yaml 파일에 자동으로 추가될 것이다.
|
name: dart_ex
description: "A new Flutter project."
publish_to: 'none' # Remove this line if you wish to publish to pub.dev
version: 1.0.0+1
environment:
sdk: '>=3.2.2 <4.0.0'
dependencies:
flutter:
sdk: flutter
cupertino_icons: ^1.0.2
equatable: ^2.0.5
freezed_annotation: ^2.4.1
json_annotation: ^4.8.1
dev_dependencies:
flutter_test:
sdk: flutter
flutter_lints: ^2.0.0
freezed: ^2.4.5
build_runner: ^2.4.7
json_serializable: ^6.7.1
flutter:
uses-material-design: true
|
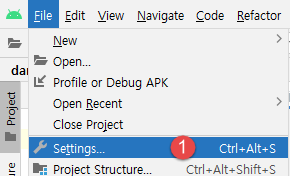
이제 LiveTemplete 를 설정해보자.
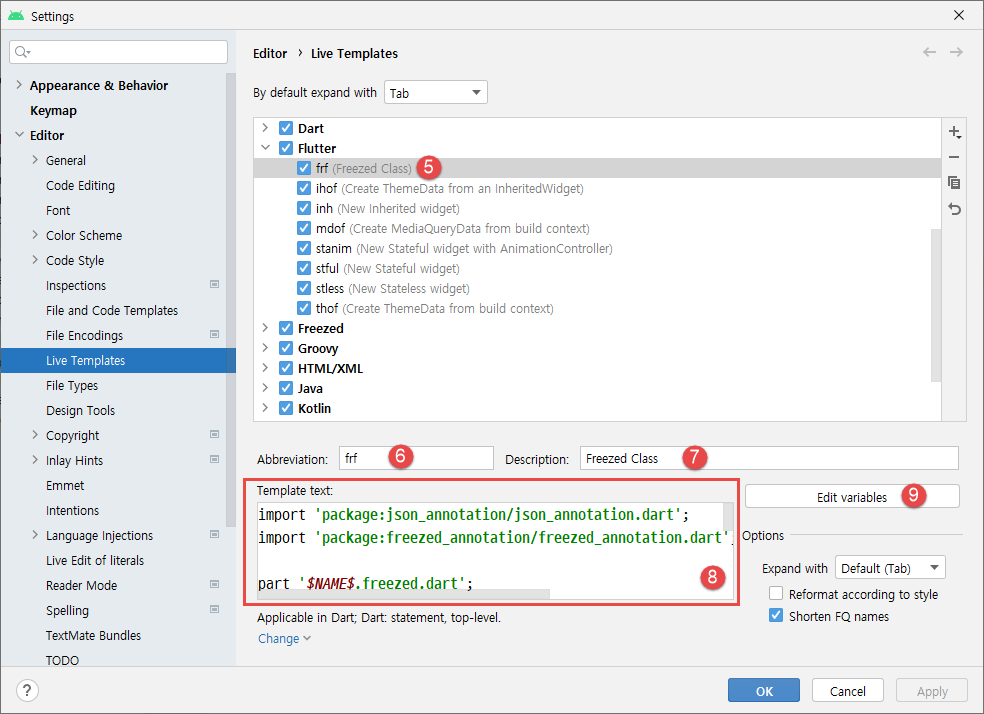
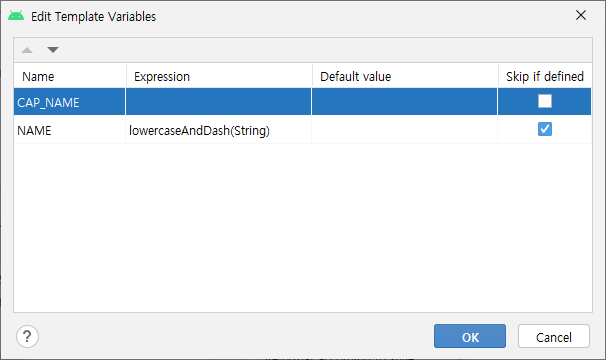
Android Studio 에서 아래와 같은 번호 순서대로 하면 된다.


5번 이름이 나타나도록 지정해준다.

8번에 붙여넣을 코드이다.
import 'package:json_annotation/json_annotation.dart';
import 'package:freezed_annotation/freezed_annotation.dart';

part '$NAME$.freezed.dart';
part '$NAME$.g.dart';

@freezed
class $CAP_NAME$ with _$$$CAP_NAME$ {
  factory $CAP_NAME$({
    $END$
  }) = _$CAP_NAME$;

  factory $CAP_NAME$.fromJson(Map<String, dynamic> json) => _$$$CAP_NAME$FromJson(json);
}

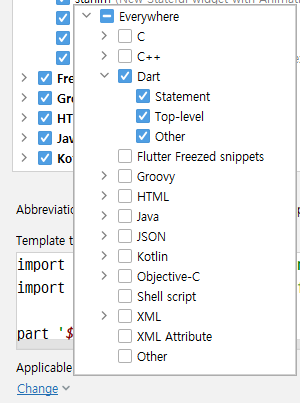
아래와 같이 Change 로 변경해줘야 한다.

여기까지 하면 자동완성하는 코드가 완성된 것이다.
실제 사용하는 예제를 유투브에서 가져왔다.
728x90
'Flutter 앱 > 환경설정' 카테고리의 다른 글
| flutter db test 에러 (0) | 2024.01.08 |
|---|---|
| Flutter Dart Data Class 자동 생성 (0) | 2023.12.13 |
| Flutter Null Safety 확인 및 Migration (0) | 2022.06.25 |
| IntelliJ IDEA Community 에 Dart 설치 (0) | 2022.06.24 |
| Flutter Upgrade (0) | 2022.06.17 |

