728x90
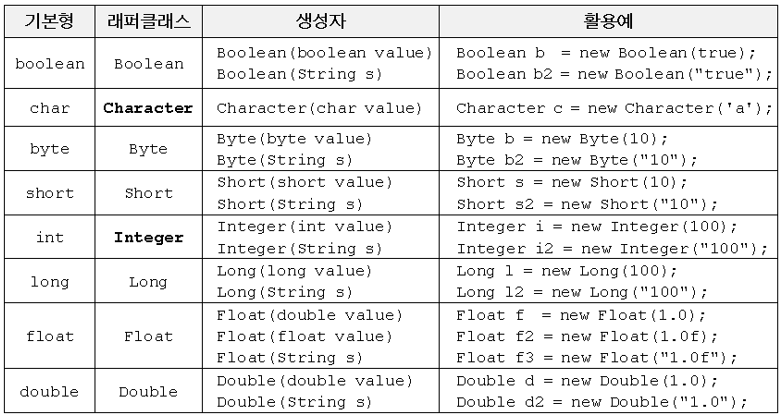
Wrapper 클래스 : 8개의 기본형을 객체로 다뤄야 할 때 사용하는 클래스
Wrapper classes provide a way to use primitive data types (int, boolean, etc..) as objects.
wrapper의 사전적 의미는 '(특히 식품) 포장지'라는 뜻이다.
기본 자료형에 대해서 객체로서 인식되도록 '포장'했다는 의미이다.
기본형 타입 변수는 소문자로 시작되는데 Wrapper 클래스 변수는 대문자로 시작된다.
이중에서 Integer 와 Character 래퍼 클래스는 기본형과 형태가 다르고 나머지는 첫글자 대/소문자만 다르다.
ArrayList<int> myNumbers = new ArrayList<int>(); // Invalid
ArrayList<Integer> myNumbers = new ArrayList<Integer>(); // Valid
자바 1.5 버전 이상부터는 박싱/언박싱이 자동으로 되므로 크게 신경쓸 필요는 없다.
사용하는 이유
1. 기본 데이터 타입을 Object로 변환할 수 있다.
2. java.util 패키지의 클래스는 객체만 처리하므로 Wrapper class는 이 경우에도 도움이 된다.
3. ArrayList 등과 같은 Collection Framework의 데이터 구조는 기본 타입이 아닌 객체만 저장하게 되고, Wrapper class를 사용하여 자동박싱/언박싱이 일어난다.
4. 멀티쓰레딩에서 동기화를 지원하려면 객체가 필요하다.
예제
|
import java.util.ArrayList;
public class WrapperClass {
public static void main(String[] args) {
// Wrapper 클래스 : 8개의 기본형을 객체로 다뤄야 할 때 사용하는 클래스
// JDK 1.5 이전에는 기본형과 참조형간 연산이 불가능
// Autoboxing은 자바 컴파일러가 primitive data type을
// 그에 상응하는 wrapper class 로 자동 변환시켜주는 것을 의미
// Unboxing 은 자바 컴파일러가 wrapper class 를 primitive data type으로 자동 변환시켜 주는 것
Integer num = 17; // Auto Boxing : Integer num = new Integer(17);
// Boxing : 기본 타입의 데이터를 wrapper class의 인스턴스로 변환하는 과정 Integer num = new Integer(1);
// wrapper class 인스턴스에 저장된 값을 변경할 수 없다.(산술 연산을 위한 클래스가 아니기 때문) ???
int n = num; // Unboxing : int n = num.intValue();
// 언박싱(UnBoxing) : wrapper class의 인스턴스에 저장된 값을 -> 기본 타입의 데이터로 꺼내는 과정
// JDK 1.5부터 boxing,unboxing이 필요한 상황에서 자바 컴파일러가 이를 자동으로 처리해준다.
System.out.println(n);
// Wrapper Class 비교연산 (==, equals)
Integer num1 = new Integer(100); // 0X100 주소에 100이 저장되어 있다고 하자.
Integer num2 = new Integer(100); // 0X200 주소에 100이 저장되어 있다고 하자.
int i = 100; //기본타입
System.out.println("num1==num2 ? "+(num1==num2)); // 참조주소 비교 (false)
System.out.println("num1.equals(num2) ? "+num1.equals(num2)); // 내용(값) 비교 (true)
System.out.println("num1.compareTo(num2)="+num1.compareTo(num2)); // 같으면 0,우측이 작으면 양수
System.out.println("num1.toString()="+num1.toString()); // 문자열
// 래퍼 클래스와 기본자료형과의 비교는 == 연산과 equals연산 모두 가능하다.
// 컴파일러가 자동으로 오토박싱과 언박싱을 해주기 때문이다.
System.out.println("래퍼클래스 == 기본타입 : "+(num1 == i)); // true
System.out.println("래퍼클래스.equals(기본타입) : "+(num1.equals(i))); // true
System.out.println("-----------------------");
// 래퍼 객체에 상응하는 값을 얻기 위해 사용
// intValue(), byteValue(), shortValue(), longValue(),
// floatValue(), doubleValue(), charValue(), booleanValue().
Integer myInt = 5;
Double myDouble = 5.99;
Character myChar = 'A';
System.out.println(myInt.intValue());
System.out.println(myDouble.doubleValue());
System.out.println(myChar.charValue());
System.out.println("-----------------------");
// 문자열을 숫자로 변환하기
int i1 = new Integer("100").intValue();
int i3 = Integer.parseInt("100");
Integer i4 = Integer.valueOf("100");
int i5 = Integer.parseInt("100",2);
int i6 = Integer.parseInt("100",8);
int i7 = Integer.parseInt("100",16);
int i8 = Integer.parseInt("FF", 16);
System.out.println(Integer.parseInt("100", 2));
System.out.println(Integer.parseInt("100", 8));
System.out.println(Integer.parseInt("100", 10));
System.out.println(Integer.parseInt("100", 16));
System.out.println(Integer.parseInt("FF", 16));
System.out.println("-----------------------");
//ArrayList<int> myNumbers = new ArrayList<int>(); // Invalid
// Generics 타입에 primitive data types는 사용 불가.
ArrayList<Integer> list = new ArrayList<>();
list.add(new Integer(100)); // 리스트에는 객체만 추가 가능
list.add(100); // JDK 1.5 이전에는 에러. Autoboxing
Integer ii = list.get(0); // list 에 저장된 첫번째 객체를 꺼낸다.
int jj = list.get(0); // intValue()로 Integer를 int로 변환
System.out.println(list.getClass().getName()); // 객체 Type 확인
System.out.println(ii.getClass().getName()); // 객체 Type 확인
System.out.println(list.get(0));
}
}
|
728x90
'안드로이드 > Java 문법' 카테고리의 다른 글
| [Java] Stream 예제 2 (0) | 2021.11.16 |
|---|---|
| [Java ] Stream 예제 (0) | 2021.11.15 |
| [Java] Generics 예제1 (2) | 2021.11.10 |
| HashMap 예제 (0) | 2021.10.30 |
| [Java] HashSet 를 이용한 ArrayList 중복제거 및 정렬 (0) | 2020.12.12 |

Link2Me