728x90
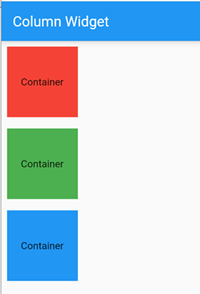
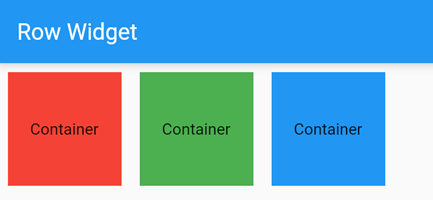
수평방향으로 위젯들을 나란히 배치하는 위젯이다.
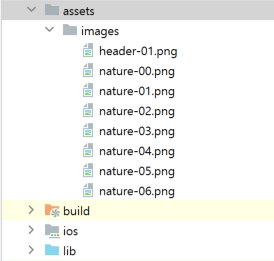
children 프로퍼티에 여러 위젯들을 나열한다.
|
@override
Widget build(BuildContext context) {
return Scaffold(
appBar: AppBar(
title: Text(widget.title),
),
body: Row(
mainAxisAlignment: MainAxisAlignment.start, // 가로 방향 왼쪽 정렬
children: [
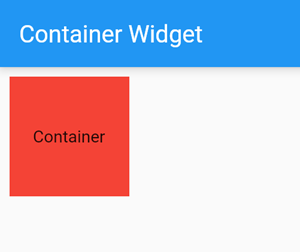
Container(
color: Colors.red,
width: 100,
height: 100,
padding: const EdgeInsets.all(8.0),
margin: const EdgeInsets.all(8.0),
child: Column(
mainAxisAlignment: MainAxisAlignment.center,
children: [
const Text(
'Container',
),
],
),
),
Container(
color: Colors.green,
width: 100,
height: 100,
padding: const EdgeInsets.all(8.0),
margin: const EdgeInsets.all(8.0),
child: Column(
mainAxisAlignment: MainAxisAlignment.center,
children: [
const Text(
'Container',
),
],
),
),
Container(
color: Colors.blue,
width: 100,
height: 100,
padding: const EdgeInsets.all(8.0),
margin: const EdgeInsets.all(8.0),
child: Column(
mainAxisAlignment: MainAxisAlignment.center,
children: [
const Text(
'Container',
),
],
),
),
],
),
);
}
|
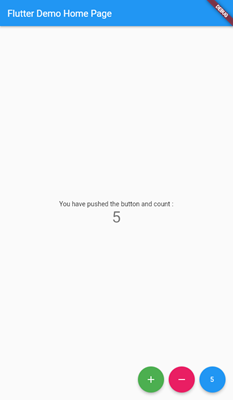
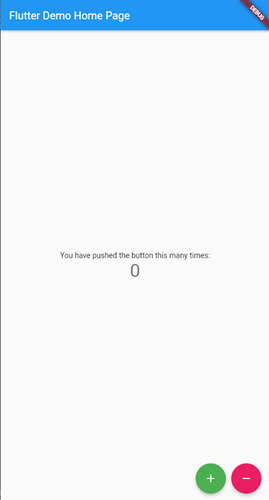
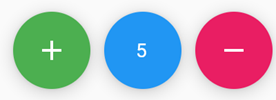
FloatingActionButton 에 Row 위젯을 적용한 예제
|
floatingActionButton: Row(
mainAxisAlignment: MainAxisAlignment.end,
children: [
FloatingActionButton(
onPressed: () {},
backgroundColor: Colors.green,
child: const Icon(Icons.add)),
SizedBox(width: 10, height: 10,), // 여백을 만들기 위해서 넣음.
FloatingActionButton(
onPressed: () {},
backgroundColor: Colors.blue,
child: const Text('5')),
SizedBox(width: 10, height: 10,), // 여백을 만들기 위해서 넣음.
FloatingActionButton(
onPressed: () {},
backgroundColor: Colors.pink,
child: const Icon(Icons.remove)),
],
),
|
FloatingActionButton 크기 조절 예제
|
floatingActionButton: Row(
mainAxisAlignment: MainAxisAlignment.end,
children: [
SizedBox(
width: 30.0,
height: 30.0,
child: FittedBox(
child: FloatingActionButton(
onPressed: () {},
backgroundColor: Colors.green,
child: const Icon(Icons.add)),
),
),
SizedBox(width: 10, height: 10,), // 여백을 만들기 위해서 넣음.
SizedBox(
width: 60.0,
height: 60.0,
child: FittedBox(
child: FloatingActionButton(
onPressed: () {},
backgroundColor: Colors.blue,
child: const Text('5')),
),
),
SizedBox(width: 10, height: 10,), // 여백을 만들기 위해서 넣음.
SizedBox(
width: 80.0,
height: 80.0,
child: FittedBox(
child: FloatingActionButton(
onPressed: () {},
backgroundColor: Colors.pink,
child: const Icon(Icons.remove)),
),
),
],
),
|
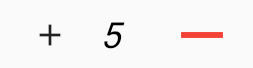
floatingActionButton IconButton 적용 예제
|
floatingActionButton: Row(
mainAxisAlignment: MainAxisAlignment.end,
children: [
SizedBox(
width: 30.0,
height: 30.0,
child: FittedBox(
child: IconButton(onPressed: () {}, icon: const Icon(Icons.add)),
),
),
SizedBox(
width: 10,
height: 10,
), // 여백을 만들기 위해서 넣음.
Text(
'5',
style: TextStyle(
fontSize: 18,
fontWeight: FontWeight.w500,
fontStyle: FontStyle.italic,
color: Colors.black,
),
),
SizedBox(
width: 10,
height: 10,
), // 여백을 만들기 위해서 넣음.
SizedBox(
width: 60.0,
height: 60.0,
child: FittedBox(
child: IconButton(
onPressed: () {},
color: Colors.red,
icon: const Icon(Icons.remove)),
),
),
],
),
|
'Flutter 앱 > Layout' 카테고리의 다른 글
| Flutter Stack (0) | 2023.12.27 |
|---|---|
| Flutter Custom Button (0) | 2022.07.25 |
| Flutter Column 위젯 (0) | 2022.06.24 |
| Flutter Container 위젯 (0) | 2022.06.24 |
| Flutter CustomScrollView (0) | 2022.06.21 |

Link2Me